Hello friends! I am SO EXCITED it's the Operation Write Home BLOG HOP weekend! Having been the very blessed wife to my Army husband for the past 24 years, and raised 2 children through several years worth of deployments, moved 18 times in 24 years of marriage, and been enriched through lots of travel and amazing friendships with other military families...I truly have a sweet spot in my heart for all military and their families! I love that OWH has stepped in and provided such a wonderful service. And without further ado, we shall begin our celebration.
In honor of this weekend, the military, and this blog hop,
all of the INSPIRED STAMPS military/Independence category stamps are ALREADY marked down for you! You can shop at:
www.inspiredstamps.com this weekend and get these great deals to make your own cards to send off to our troops! We will have ALL orders placed this weekend out the next business day in the mail!
We are also having a
Giveaway:
WIN THE 'More Perfect Sentiments' clear stamp set
and our His Little Ones: Soldier Boy! Just leave us a comment by Monday noon and we'll choose some winners for these stamp sets!! Winner announced in Monday night's post here and on our FACEBOOK page (come like us!)

Here is the
tutorial followed by the cards:
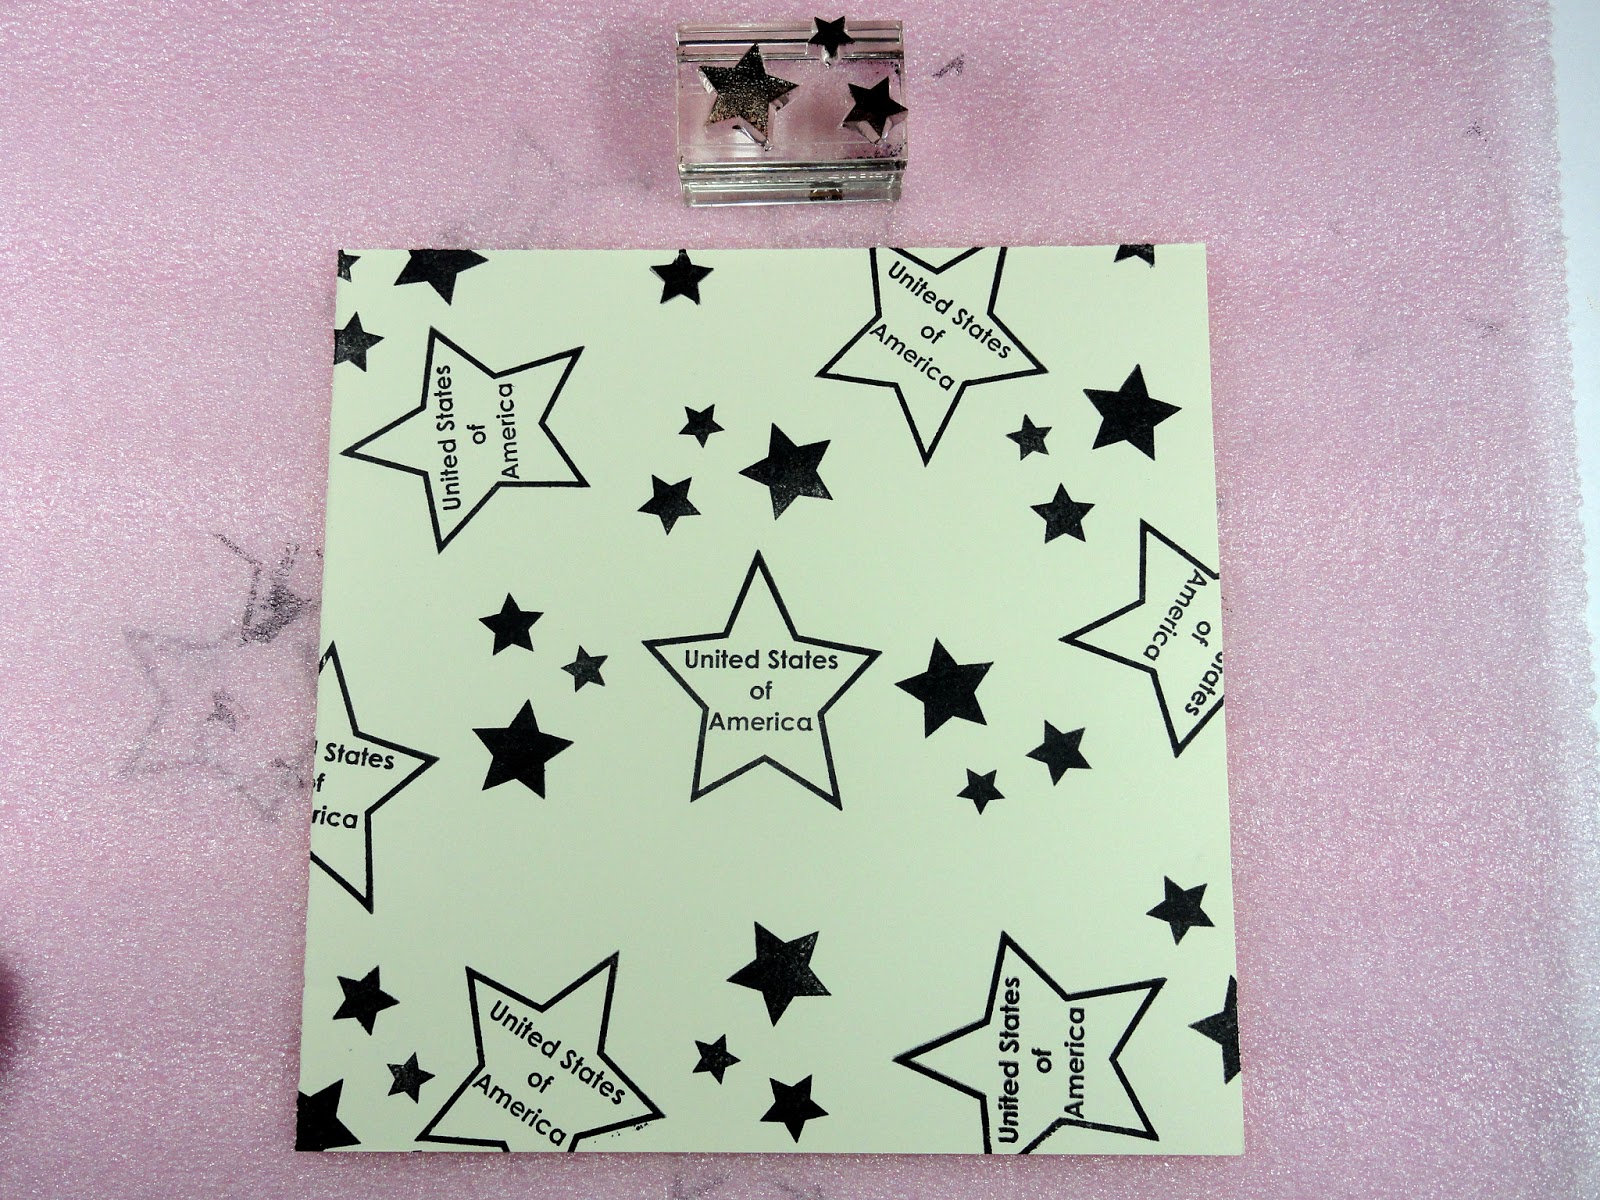
To make the background paper:
1. RANDOMLY stamp your largest image, trying to make a 'triangle' each time you have your stamp down. So here is the first set of 3 I stamped in a triangle manner using a stamp from the
Psalm 91 Protection stamp set:
Then using 2 of the 3 stars I stamped as my guide I add another stamped star (notice those 3 stars also make a 'triangle' shape)
Keep stamping until you have your entire piece of paper (6x6 here) stamped. It looks best if some of the stamps are partly off the paper:
Next I took the 3 stars from the same stamp set and arranged them like so. I again will stamp the paper using somewhat of a triangle stamping formation to keep it looking even:
The 3rd stamp is your smallest and it gets to 'fill in' the areas that are left:
2. NEXT: you will need sticky notes. I use a triangle form, but you could use squares, circles, hexagons, whatever you like. I use these as masks (meaning they are giving me a line I want and keeping the ink off the rest of the paper:
I sponge tea dye first, then the walnut stain only on the edges of the sticky paper. Start sponging on the sticky paper and move into your triangle to get a smoother sponging!
When I remove the sticky notes, this is what I have:
Using one of the sides of the above inked triangle as my guide, I set up another triangle with sticky notes:
Below I show you that the sticky note that is slightly raised leaves a little white off of the edge of the sticky note so that there will be some white lines in between each triangle:
I finished triangle #2 with the white line. If you smudge (you can see one of mine in this shot below), no big deal, just make sure that gets ink when you set up the sticky note triangle that covers it:
Here's an edge further into the inking:
And the sides I put the sticky note off the paper so that it will get sponged too:
Here is my handmade background paper using only Inspired Stamps and Distress Inks. You can do this is ANY color (reds or greens at Christmas; pastels in spring; blues, etc):
3. Cut your paper based on what you need, I made 2 cards using this 6x6 background piece and the OWH SKETCH #96 for this one ...INK THE EDGES OF EVERYTHING YOU CUT!!
(and Sketch #42 for the next one)
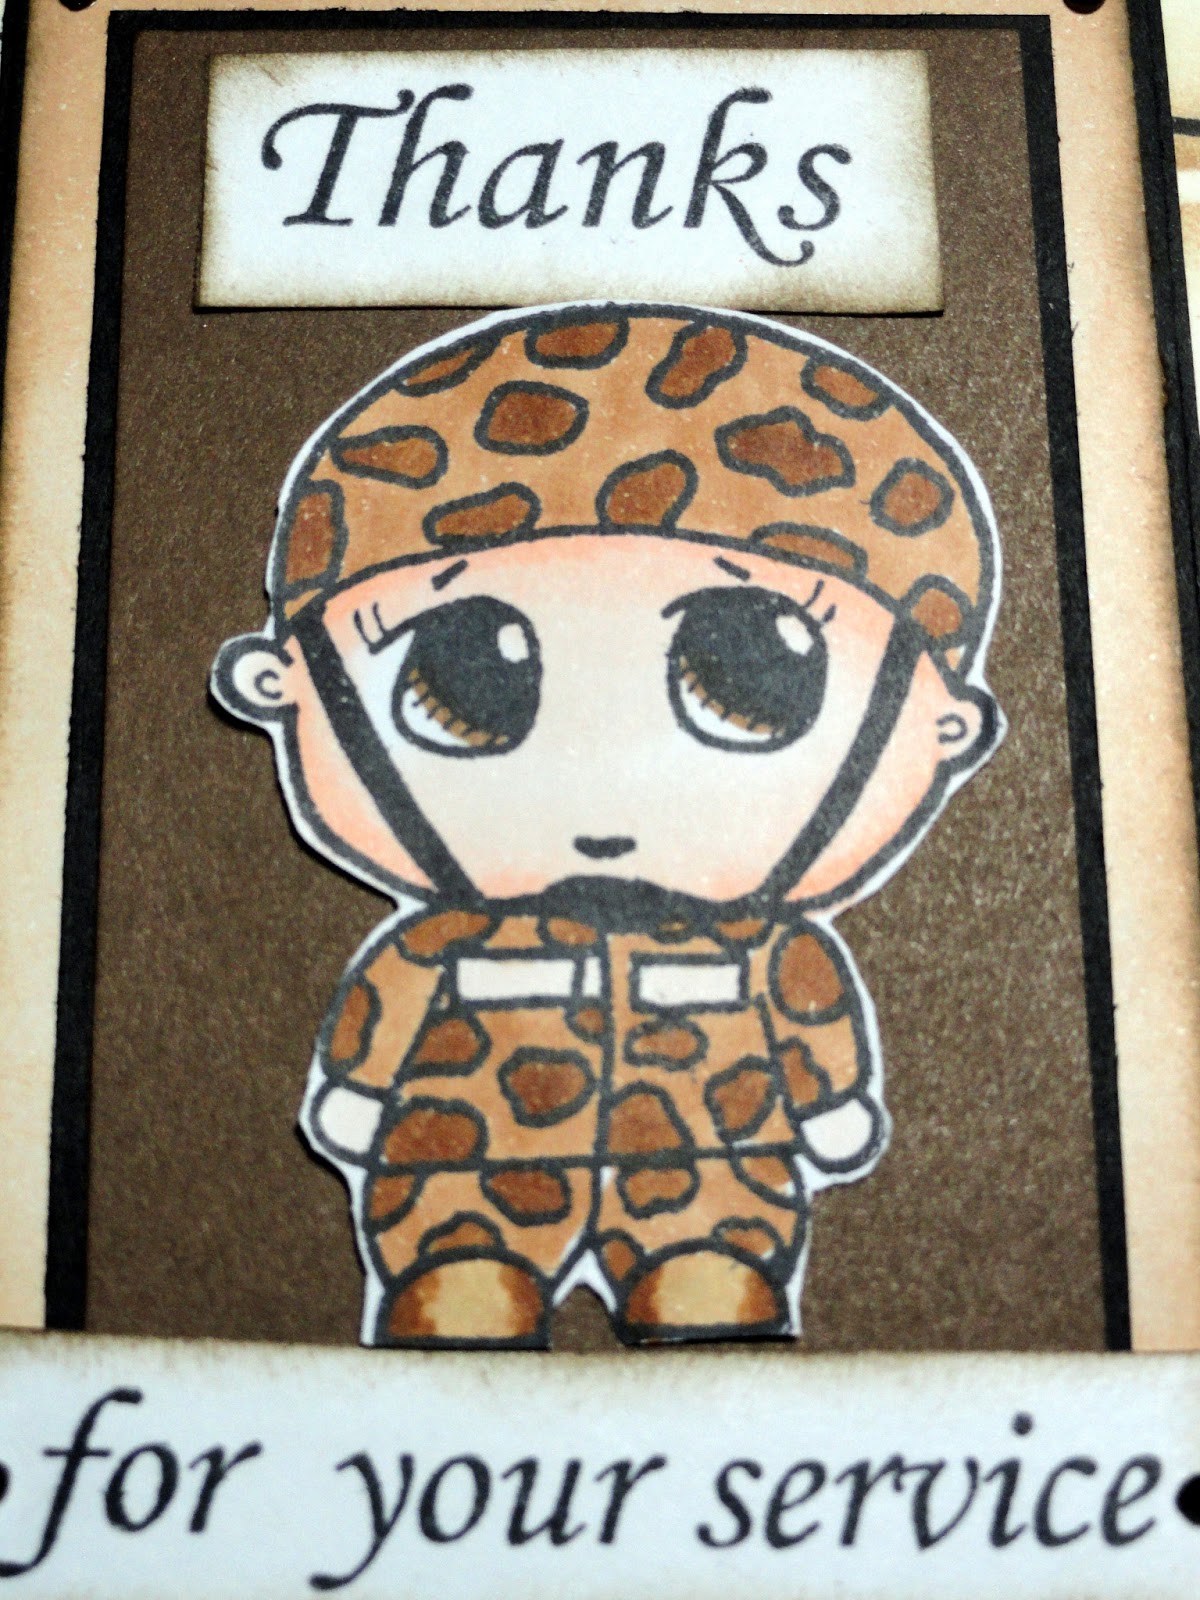
I used Copic Markers shown below for the His Little Ones Characters (
HLO: Soldier with helmet and HLO: Soldier Boy): E 33 & 37 for the uniforms and one pair of boots, E 30, 34, 55, and YR17(not shown) for the hair; E000, 01, and 02 for the skin; C8 & C2 for the 'black' boots (not shown)
The text on each is from the
MORE PERFECT SENTIMENTS stamp set.
I created this guideline you can use for other soldier coloring:
Thanks so much for stopping by today!!
May God bless you!
Antoinette and all of us at Inspired Stamps
Now be sure leave us a comment to be entered in our giveaway before you head over to see the rest of the amazing blog hop:
OPERATION WRITE HOME BLOG HOP...CLICK HERE


What a wonderful background - thank you so much for the tutorial Antoinette.
ReplyDeleteBlessings
Maxine
I absolutely love the background paper idea! I will have to try that. Thanks for being part of the bloghop and supporting OWH!
ReplyDeleteWhat cute cards and thank you for the tutorial on the wonderful background. I love it and definitely want to try it! Thank you so much for your support of OWH.
ReplyDeleteLove the background you made. Thank you so much for showing us how. Both cards are so cute with it. Love the coloring. Thank you for supporting OWH.
ReplyDeleteAntoinette: great background!!! wao!! love your coloring on the soldiers.
ReplyDeletegreat job!!
What a great tutorial on how to make the background paper.
ReplyDeleteLove your cards! The background is super, thanks for the tutorial. :)
ReplyDeleteWOW I absolutely love your background, thanks so much for the tutorial! Adorable images and fantastic coloring!
ReplyDeleteTammy x
This is a perfect stop! I have several Copics but never knew which colors were best for camos And triangles in making your own patterned paper. Thanks for the lessons here. The adorable eyes on your guys are beckoning me to make cards!
ReplyDeleteHi Antoinette! What a neat idea for making your own background paper; I am loving the star and hero stamps you used! Beautiful cards! Thanks for supporting OWH; have fun hopping!
ReplyDeleteGreat tutorial! Such a unique result and so many great coloring examples and tips too. Thanks so much for your sacrifices as a military family and thanks for joining in the hop and supporting Operation Write Home too!
ReplyDeleteWhat a cool idea! Now to find my stamps. I love the colors you choose.
ReplyDeleteWow - what a great background - very different technique I've never seen. With some creativity, this masking can be any shape - great idea, thanks.
ReplyDeleteWow so much work on the background! Very worth it- great cards!
ReplyDeletewow--great cards and thanks for the tutorial on making the background paper.
ReplyDeleteVery cool tutorial for the background paper. I loved seeing the step by step process and can't wait to give it a try. Thanks for joining in the hop, for your inspired stamps, and the giveaway...so much to love.
ReplyDeleteThis turned out really cute. TFS.
ReplyDeleteWow what a great background to such a cute card! Love it!
ReplyDeleteThanks for the tutorial - background paper creation never quite happens the way I'd like it to.
ReplyDeleteWonderful project and great tutorial! thanks for offering a giveaway! Hope to win! Happy Memorial Day Weekend!
ReplyDelete:) Marie (OWH #119)
love your random stamping & coloring technique, thanks for sharing!
ReplyDeleteI love the tutorial for making a stamped page.
ReplyDeleteCool way to do the background paper. Thanks for the tutorial! Love your bible quote stamps thanks for making them. I use them for cards/bookmarks for my bible class group. Thanks for supporting OWH!
ReplyDeleteWOW, this is such a great card. Enjoyed the tutorial on how you did the stamping, that is such a great idea. Will have to try that.
ReplyDeleteThanks for the wonderful tutorial. This looks like a lot of work but so worth the effort for this beautiful result. Fabulous cards!
ReplyDeleteThanks for supporting OWH!
That card really caught my eye, and it's not that hard to do as I read the instructions. Need to put this on my to-do list.
ReplyDeleteThanks for the tutorial on making an interesting background paper. Great idea for when you can't find the exact paper you want.
ReplyDeleteThese are just DARLING, Antoinette! Love the background paper tutorial...so cool!
ReplyDeleteGreat background technique! And you little soldier boy is really cute. Love the set of sentiments, perfect for OWH cards! Thanks for your support of our Heroes and OWH. Thanks to your family for your service to our country!
ReplyDeleteHappy Memorial Day,
R/
Wonderful card! Love the way you did the background.
ReplyDeleteWhat a great background you created for that little soldier. Love the card big time!
ReplyDeleteThe cards are fantastic! Thanks for the step by step for the background.
ReplyDeleteThank you for the tutorial!!! I will definitely be trying that out!!! I do like the effect it has!!! Thank you for supporting OWH!!!
ReplyDeleteWhat a wonderful tutorial! I've made lots of background papers before, but I really like the tip with the post its to make the triangles. I'm so pleased to see that you're still supporting OWH. Since I've already been blessed to receive one of your blog candies from a previous OWH BLoghop, please pick the next person in line if I would happen to win. Thanks again!
ReplyDeleteI've bookmarked this tutorial so that I can give it a try! I'm blown away with the way you sponged your background with those triangle post-it notes! What a fabulous look! Thanks for sharing such a fun technique, along with your adorable cards! Have a happy Memorial Day Weekend!
ReplyDeleteWow! What a great background paper you made! I will have to try that! The colors you used are great with the army boys in their fatigues. Great job!
ReplyDeleteWow what a great card. Thank you for the background tutorial, I love tutorials!! The cards are so nicely made. thank you for sharing and supporting OWH. I would really love to win that blog "candy"
ReplyDeleteWow - Thanks for the tutorials. I love the background pattern. Great help for a beginner like me.
ReplyDeleteOh my, such techniques and details. What a terrific card.
ReplyDeleteWonderful background. Thank you for the tut!
ReplyDeleteHummer Hugs,
Misty
http://delitefulsuds.blogspot.com/
hummingbird204 at comcast dot net
WOW! Great way to make the back ground PP love it. and those images are oh so cute I may need a Navy boy as well as the other one I have family in the Navy as well as USAF and really when making card for OWH both any and all are good to have.
ReplyDeletereflections:0)
I've never seen a background like that! Wonderful tutorial!! And those soldier boys are adorable. As the wife and mother of Army "boys" I appreciate your connection to the military. Thanks for your participation in the OWH Blog Hop and your company's support of this amazing organization!
ReplyDeleteLove this background paper, made very beautiful cards. Thanks for showing how to do it. I'm sure going to try it. Mary L Schreiber
ReplyDeleteThe card is great. The background is wonderful. Thanks for sharing how to do it. Thanks for supporting OWH.
ReplyDeletegreat technique TFS
ReplyDeletewow...that's a lot of work and the card came out incredible. Very nice
ReplyDeleteGreat tutorial and cards.
ReplyDeleteCute stamps and card, Antoinette, love the way you colored your soldier! TFS and have a great weekend. #133
ReplyDeleteOh, these are terrific! ... and I am ALWAYS on the hunt for military/law enforcement stamps to make OWH cards and share with my better half. thanks for sharing the colours you used and the stamp-on-stamp technique. that's a new one for me that looks very do-able (and highly appreciated since i am a newbie)
ReplyDeleteLove how you created the background paper. Very clever and beautiful. TFS.
ReplyDeleteAntoinette, What a fabulous background! Thanks so much for the tutorial. And, thanks for all you do for OWH!
ReplyDeleteI love the background paper. Thank you so much for the tutorial. Both cards turned out terrific.
ReplyDeleteWOW! That background you created is sooo cool, and your cards are perfect! Thanks for the tutorial!
ReplyDeleteWow...that background is amazing! Thank you so much for the tutorial! Thank you for your rockin' support of OWH! You are truly appreciated!!
ReplyDeleteFantastic tutorial on your inking technique. It makes a great background. I'll be back and purchase some of your scripture stamps. Love your stamps. Thank you so much for sharing with today at OWH! ~ Marilyn
ReplyDeleteWOW! This is sooo cool! Just love all the detail you put into making that patterned paper. The Copic colors you chose fit perfectly. Very nice card and tutorial. Thanks for offering blog candy and I hpoe I win. (Amy A. #118)
ReplyDeleteVery cool technique.... thanks
ReplyDeleteFabulous tutorial, wonderful cards, and darling images - trifecta! Thanks for the wonderful step by step on the background, and more importantly for your support of OWH! I'll be shopping when I'm done hopping!
ReplyDeleteWhat a great tutorial for background paper. Love it.
ReplyDeleteWow!! I love how you made your background paper. Thank you for showing us your technique.
ReplyDeletewonderful cards and I LOVE your tutorial!
ReplyDeleteLove the tutorial. Beautiful background paper.
ReplyDeleteThank you for the tutorial. I love using your stamps for OWH cards. They are great!
ReplyDeleteJust love that background and am so gonna lift it=:)
ReplyDeleteThanks for sharing with all of us.
Great tutorial that has me inspired! Thanks for sharing.
ReplyDeleteGorgeous background technique and coloring of your little men...I want to try this right away! Thanks so much for sharing.
ReplyDeleteThank you for participating in this great cause. I love your tutorial and great cards too!
ReplyDeletewow thanks for the tutorial - love love your images and cards - i too was an Army wife - hubby retired after 28 years we raised 3 children and moved many times as well but cannot complain about any of our assignments - he is now an Air Force civilian and our youngest son is a 2LT in the Army reserves - love to see all the kind support for our military heroes - thanks for sharing and supporting OWH
ReplyDeleteGreat tutorial, thank you. Both images are so cute, your cards are beautiful.
ReplyDeleteAntoinette, what a fantastic card! Thank you so much for the great tutorial and the color guide for the soldiers! Thank you also, for your fantastic support of OWH! Your stamps are fantastic!
ReplyDeleteFun, sweet card, and great tutorial! Thanks for sharing!
ReplyDeleteThanks for the tutorial!
ReplyDeleteGreat AnyHero cards! And thank you soooo much for this tutorial (and the pix to go with it)!
ReplyDeleteGreat cards!! Thanks so much for the tutorial; I'll have to give that a try! And thanks for the sales and candy, too!! WOO-HOO!! TFS and supporting OWH! RBBRRMQN at YAHOO dot COM
ReplyDeleteWhat a cool technique/tutorial! Love it! Wonderful cards!
ReplyDeleteThanks for the tutorial - very interesting. Love the finished cards, very unique.
ReplyDeleteWow, that's a great back ground.
ReplyDeleteWonderful cards. Love the cute solder images and how you made the great background. Thanks for sharing.
ReplyDeleteI love that you made your own pattern paper. I love the way you color your images.
ReplyDeleteThank you for the tutorial, I love the background on this card!
ReplyDeleteI love your coloring on these cards. They're adorable, and I'm sure any soldier would be thrilled to get one. Thanks for the tutorial too. Linda E.
ReplyDeleteThank you for the great tutorial and for the coloring guide too
ReplyDeleteMy favorite part of your cards are the soldiers - great job coloring!
Thank you for sharing this wonderful tutorial & cards - I will definitely have to give this a try! Love the cards you made with it great choice of camo colors, and the little heros are so nicely colored & very cute! Thank your husband for his service, and thank you for your continued support of our heros and OWH.
ReplyDeleteBeautiful cards! Thank you for sharing the tutorial and the colors for the uniforms. Thank you and your husband for his service and for your support of OWH!
ReplyDeletewonderful cards and thanks for the tutorial. TFS.
ReplyDeleteThanks for the step-by-step tutorial to make that great background. The cards are amazingly detailed and striking. I wish I could color like that! Thanks for supporting OWH and participating in the hop.
ReplyDeleteThank you so much for the background tutorial. Going to try that one. Great coloring. That I cannot do but try sometimes. Thank you Charlsie
ReplyDeleteWhat a nice technique for backgrounds, I will try this. Thanks so much.
ReplyDeleteLove this tutorial on masking a background and that little military guy stamp image is SO darn adorable!! love how you colored him!
ReplyDeleteThanks for showing us how you made the stamped background. I love the inking effect and super cute image. Your coloring is fabulous!
ReplyDeletewhoa! that's amazing how you created that background, and then all the work you did with your copic coloring! not a simple card, but really so amazing!
ReplyDeleteWow! The tutorial was very helpful, the markdown on your site for stamps greatly appreciated and the card is stunning! Thank you for supporting Operation Write Home this weekend.
ReplyDeleteGreat tutorial--thank you sharing that, I know it took time to do, take photos and post. Like the images and cards.
ReplyDeleteLove the tutorial on this background. It is such a neat idea! Beautiful job!
ReplyDeleteFirst thank you for your service! Thank you for the tutorial ! Love this adorable card and all the steps it took to make it! Gorgeous coloring too! God Bless you and your family!
ReplyDeleteLOVE, LOVE, LOVE it!!!!
ReplyDeleteLove your card. Thank you so much for the tutorial.
ReplyDeleteThank you for being such a help mate to your hubby throughout his military career. I know it's tough.
Hugs,
M.E.
Great background tutorial, thanks! Great coloring on those images, too. (leslie #113)
ReplyDeleteGreat tutorial on the background. Thank you for sharing and supporting OWH!
ReplyDeleteAmanda :)
www.ajsdigishoppe.com
great card and tutorial
ReplyDeleteI love the background - thanks so much for sharing that technique!
ReplyDeleteOMG! That vintage star paper you created is to die for! I'm a very experienced stamper....and have not seen that technique before. I don't generally like to make my own backgrounds...as there's so much great paper out there....but this idea I will have to steal! Thanks for the inspiration!
ReplyDeleteThat is such a great tutorial, will have to give it a try.
ReplyDeleteThanks
shanasewing@yahoo.com
Oh, thanks so much for the tutorial and for sharing your fabulous card. Thank you for your family's service and sacrifices!
ReplyDeleteLove your tutorial! and so want to win the soldier boy!!!
ReplyDeleteYour background is fantastic! Thanks so much for the wonderful tutorial! The design works so well on both of your terrific cards!
ReplyDeleteThank you for giving us a tutorial on how you made your card. The soldier boy with the helmet is adorable. I visited and liked your Facebook page. I wrote down your blog and shopping sites. I'll be back : ) I'm here because of Operation Write Home. Thank you for giving us a chance to win!
ReplyDeletei was intrigued with how you did the background on this card, can't wait to try it. and the image is ADORABLE!!
ReplyDeleteTFS!
linda patti tpatti@windstream.net
What a sweet card! Thanks for the tutorial on the background.
ReplyDeleteLove the tutorial! SO many ways to utilize this background! Your soldiers are adorable! TFS! macaskillbarbara at yahoo.com
ReplyDeleteI love your cards. Thanks for the tute!
ReplyDeleteWhat a beautiful card and a wonderful tutorial!
ReplyDeleteBeth F. OWH #114
I love the background you created for this card. Thank you for sharing how it is done. This is a great card and the stamp is adorable.
ReplyDeleteDarling card. Thanks for the tutorial. I'm bookmarking it for later use. Thanks for supporting OWH.
ReplyDeleteGreat idea for the background! Thanks for sharing the technique!
ReplyDeleteThanks for the tute on background paper. The soldier boy is so cute. We appreciate your support of OWH.
ReplyDeleteWow....your stamps ROCK...I love them with the huge eyes and the coloring is awesome. I also love you technique. I have not seen this before. Very interesting concept. Both layouts are awesome! Thank you for sharing!
ReplyDeleteOMG! Your background is fabulous. Thanks for visiting my blog.
ReplyDeleteThanks for a great background tutorial. The stamps are smile-makers! Thanks for sharing. :)
ReplyDeleteGreat technique for the background. Thanks for sharing.
ReplyDeleteYour background is incredible! I'm thinking crazy quilt. :) I really like that you have enough paper for two cards. Your little guys are adorable. Love your coloring on them. Thanks for the guide.
ReplyDeleteNeat tutorial, thanks for sharing that. Wonderful card and perfect sentiment!
ReplyDeleteWhat a great tutorial. Thank you for sharing it. And your card is adorable. That little guy is so cute.
ReplyDeleteApril
Thank you, Inspired Stamps, for supporting OWH. We appreciate your involvement. ~Dotti H., OWH Board member
ReplyDeletelove that camo pattern technique!! way easy and way cool!! thanks!
ReplyDeleteThank you so much for the tutorial! I can't wait to try it. Thank you for supporting OWH.
ReplyDeleteAlso...thanks for the chance at the blog candy!
DeleteWowzers, what an amazing background and thank you for the tutorial ! Thanks for the inspiration and making cards for our heroes !
ReplyDeleteWhat a great card...thank you so much for the photo tutorial!
ReplyDeleteThese are soooooo precious! Thank u for showing the coolest tutorial ever on making background paper using Post Its! And thank u for the coloring guidelines using Copics! These are incredible cards! Your talent is impressive. TFS and for helping out OWH!
ReplyDeleteWhat a great tutorial for creating the background. Both of your cards are awesome. Thanks for sharing.
ReplyDeleteThat is such an awesome background! I love it! Post it's are just so useful aren't they? Thanks for your families sacrifice and your husbands service to our country!
ReplyDeleteWow... Your cards are amazing. Thank you for the tutorial. The stamps and images are wonderful. Thank you for your sacrifices as a military wife. Your husband is a hero to so many. Thank him for me for his service to our country. Oh and your coloring is so wonderful. Thanks for supporting and joining in on the hop.
ReplyDeleteWhat a great technique for one of a kind background! TFS!
ReplyDeleteBobbisTreasure at aol dot com
Adorable cards. Love the way you made the background.
ReplyDeleteGreat background technique. Have to write this one down to try later.
ReplyDeleteAdorable image and fabulous tutorial! Thanks for supporting OWH.
ReplyDeleteI will never remember all of this! Oh my gosh, I am in awe of all there is to learn! YOU are amazing at creating your own paper!
ReplyDeleteWow!!! Your tutorial is so fantastic!!! Thank you for sharing this. And the card is simply awesome!!!!
ReplyDeleteEvery Hero is a star , how appropriate are your designs.
ReplyDeleteIt might be after the weekend here in the UK, but I just wanted to support such a good cause.
"Like the ivy and the wall, together we stand united we fall"
Great cards, thanks for the tutorial!
ReplyDeleteNot only great card, but such generosity! Thank you for the tutorial and for the opportunity to save and possibly win! Over the top, but we certainly appreciate it. :) I'll be looking for you on Facebook soon and checking out your store tonight!
ReplyDeletevery nice cards and cute images! love your tutorial on the background panel. Thanks for sharing!
ReplyDeleteHow totally adorable! I love that technique--thanks for sharing!
ReplyDeleteAbsolutely adorable! Amazing coloring! Thanks so much for sharing your talent for this amazing cause! God Bless!
ReplyDeleteThank you for the great background technique tutorial. It was very easy to follow and gives me lots of ideas. Thank you too for your wonderful support of OWH and our service men and women. Glenda F
ReplyDeleteOver the top, great background technique, thanks for your support of OWH
ReplyDeleteThank you for walking us through the whole process. You did an awesome job.
ReplyDeleteThank you for sharing!
Lyn
Cute cards! Thanks for the tutorial on how you made your patterned paper!
ReplyDeleteTFS and supporting OWH. Nice tut. Your images are adorable. From a fellow military wife, thank YOU for your service, too!
ReplyDeleteVery cute cards! Thanks for the tutorial on making background paper as well as the Copic guide. I just started coloring with Copics so I need all the help I can get!
ReplyDelete