Showing posts with label 12 Weeks of Christmas Tutorials with His Little Ones characters!. Show all posts

Wednesday, November 20, 2013

Copic Marker Coloring Inspired Stamps Tutorial: Week 8 of 12 Weeks of Christmas Tutorials with His Little Ones Characters

Welcome to this week's Christmas Tutorial with Inspired Stamps!  Since I love Copics so much, I thought I'd share with you a little about Copic markers and colouring.  I'm certainly no expert but just some tips from my own experience.  I never knew I love colouring so much till I bought my first set of Copic Markers.

When I first decided to try Copics, I had such a tough time deciding what to buy.  I must have read a hundred tips before I took the plunge.  Basically, the following are the Copic markers colours : [B- Blue] [BG- Blue Green] [BV- Blue Violet] [G- Green] [YG- Yellow Green] [Y- Yellow] [YR- Yellow Red] [R- Red] [RV- Red Violet] [V- Violet] [E- Earth] [C- Cool Gray] [N- Neutral Gray] [T- Toner Gray] [W- Warm Gray].  I buy mostly the Sketch markers, and the colours and numbers are labeled on the tip of the caps.  If you would like to know more about the Copics colour chart and family, please click here.

I thought I'd show you my Copics collection :)  I have collected over 200+ markers and store them in jars so I can easily move them around or pick some colours that I want to use - I colour while watching the tv most days.
After buying so many markers, I must say I only use the few that I really like, and it is too excessive to own so many markers :)

Here are some of my favourites, and this would be my recommendation to those who would like to start with Copics.
These greens are my favourite, I love some of the YG combination as well
These are my favourite pinks - the little Ciao in the photo is RV10
These are my favourites for backgrounds and skies
My favourite blue range - great for colouring jeans
I love the R30 series (I use them all the time) and also the R80's
I love so many of the E series but these are my favourites, the 2 Ciao markers are E93 & #95.
I'll share some step by step photos how I coloured the new HLO: Angel - which I absolutely love.  My favourite skin colours are E13, E01 and E50. I like to start with the darkest shade first, and then blending it with the lighter shades.
Here, I just added E13 to the angel, just on the forehead, neck and hands as shown
Then I blended E13 with a E01 the next lighter marker
Using E50, I picked up the pink R20 and coloured the cheeks
Then, I used E50 to blend everything, adding a little of E01 for areas where I need a little more shadowing
For hair, I used E99, E23 and E21. 
Add E99 as shown
Add E25 and extend the strokes a little further
Add E21 and blend the colours
Blend a little more with E50, and colour his mouth with R20.  Then I added some BG10 to his wings
Added BG10, BG000 and the Colourless blender to the wings and his tunic and shoes. I added BG02 to the corners of his eyes.
The little Angel
 Using a sharp pointed scissors, the image is cut out, and ready to be used on the card.
And, here is the finished card.  I hope you find the step-by-step instructions helpful, and if you have any questions, please email or leave me a comment and I'll try my best to answer them.  I'm not an expert in Copics, I learnt how to use the markers mainly from watching videos of manga artists in action :)

Thank you for visiting me.  Have a great day!
Kary

Thursday, November 14, 2013

12 Weeks of Christmas Tutorials with His Little Ones characters: Week 6 + DT Thursday with Chere and Deneen!!


Hello friends!   Today is normally a Design Team Thursday, but there is no way I could leave you with just a photo of what Chere and Deneen created for today, so I am including their posts as part of our 12 Weeks of Christmas Tutorials so you can find these easily by clicking on the link in the side bar!  If you are interested in learning more on how Deneen made her tea light lantern, leave us a comment below!  Be sure to take advantage of our sale to get all these great stamps:


 DENEEN'S TEA LIGHT LANTERN using many of our new release stamps!
Today I'm sharing a tea light lantern with you, I had a lot of fun designing it, okay, I had a few frustrating moments designing it, but, I had a lot of fun decorating it!  (I may do a tutorial on it at some point, just so that you don't make the mistakes I made along the way, lol!!)


Lantern Size:  4" x 6.75"
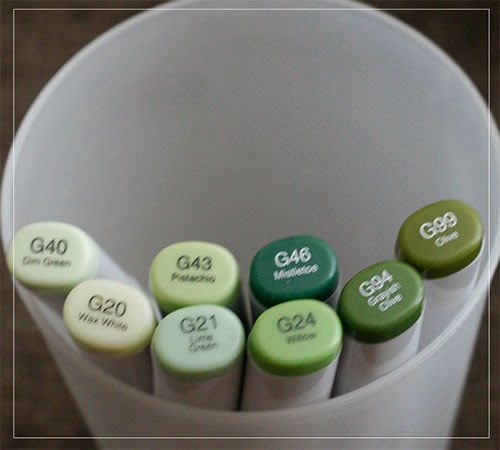
I used HLO:  Shepherd Boy, Sheep Standing, and HLO: Angel.  The verses are on vellum and I used Luke 2:11, and Luke 2:13-14
On the other 2 sides I used Laying Sheep, and Nativity Set, the verse  I used here is included with the Nativity Set! 
Copics Used:
Sheep - W0, W1, W3
Copics Used:
Skin - E000, E00, YR01
Hair - Y02, Y11, Y13, Y21
Robe/Wings - W0, W1, W3
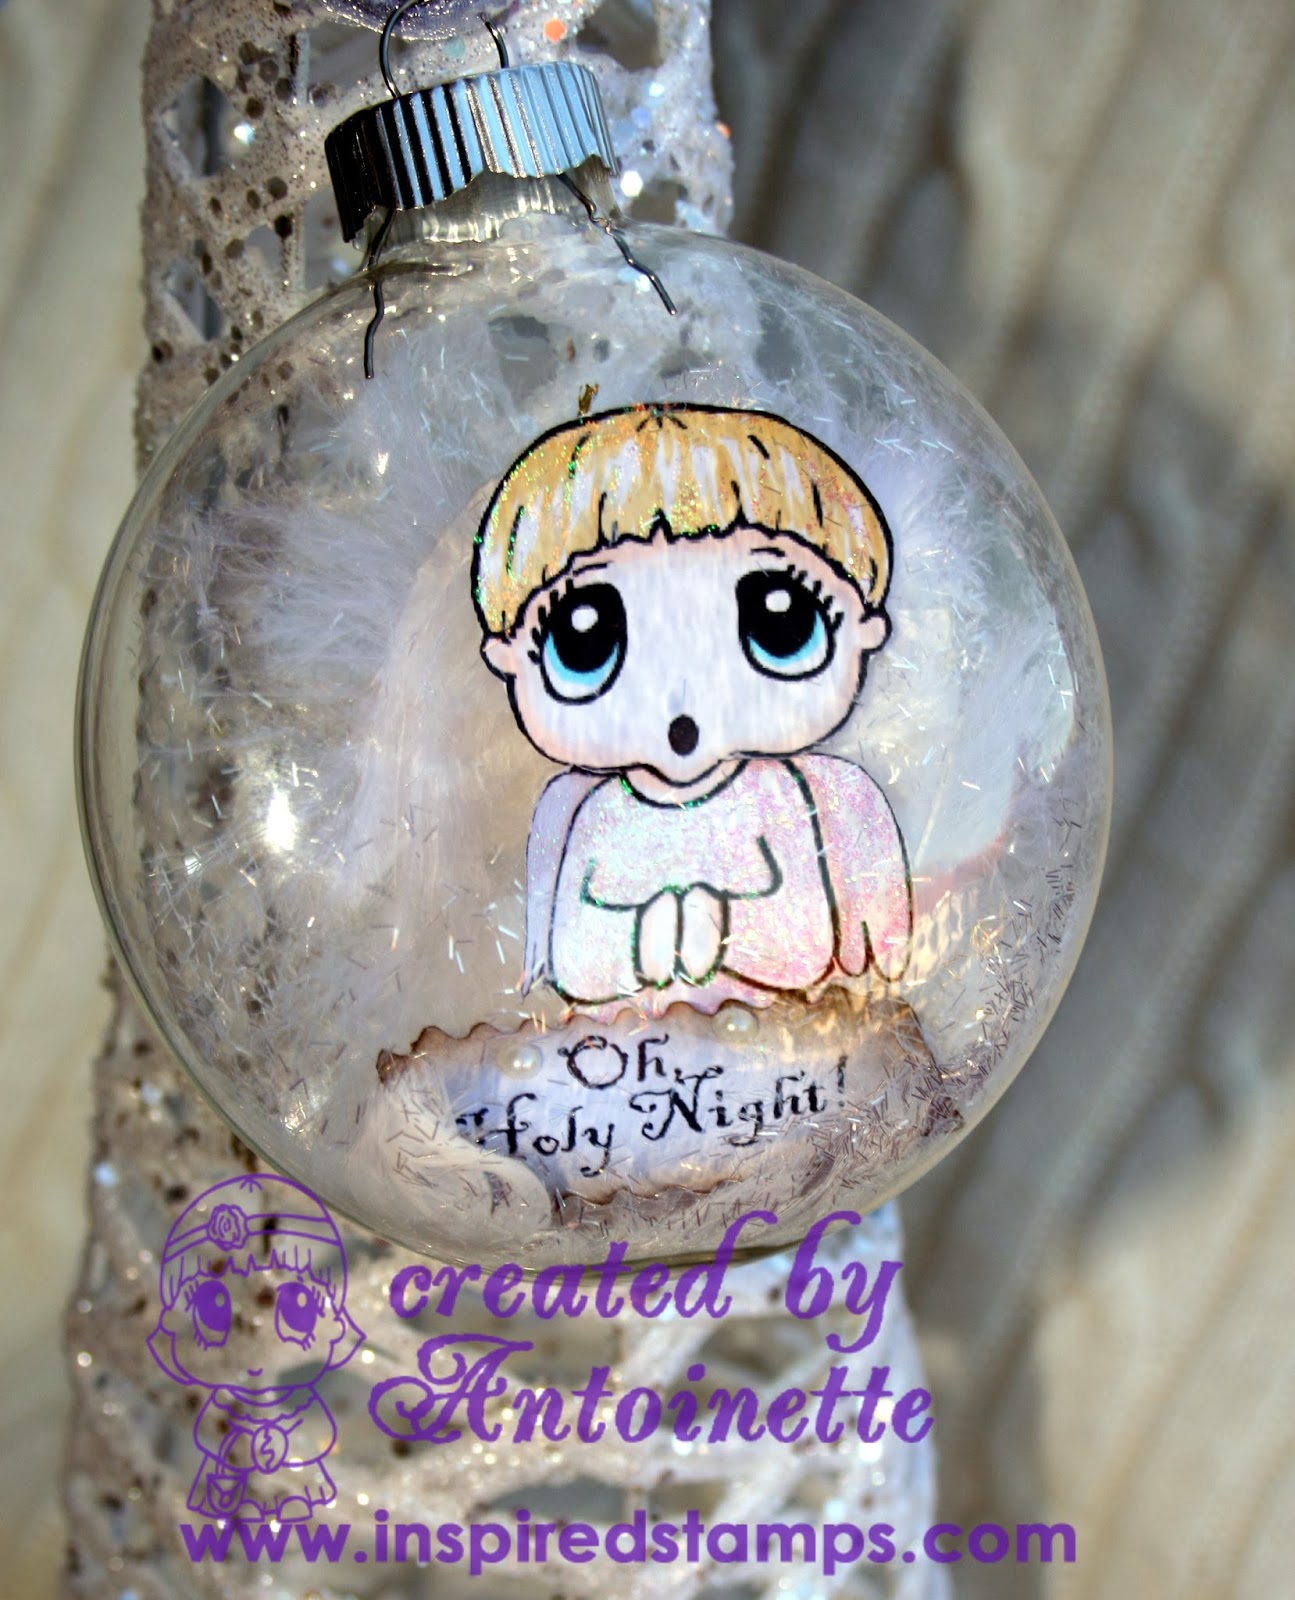
Copics Used:
Skin - E000, E00, YR01
Hair - E13, E15, E17, E18
Headdress - E41, E42, E43
 Robe - G20, G21
Staff - E15, E18
Eyes - E17
The star is a bit of an oopsie, I didn't realize how much the Stickles would wrinkle the vellum, next time I'll either use something else or let it dry before putting it on.  First I traced a star shape with a black felt tip marker, and then I coloured the back of the vellum with Copic Y08.

 Copics Used:
Mary - Skin-E000, E00, YR01; Hair-E13, E15, E17, E18; Clothes-B91, B93, B95; Eyes-B91.
Joseph - Skin-E000, E00, YR01; Hair-E13, E15, E17, E18; Clothes-E41, E42, E43; Eyes-E17.
Manager - Wood-E13, E15, E17, E18; Straw-Y11, Y13, Y21; Swaddling-E41, E42, E43, Skin-E000, E00, YR01.
 

Enjoying the candle in the dark.

Recipe:  Inspired Stamps SS-HLO: Angel, HLO:  Shepherd Boy, Standing Sheep, Laying Sheep, Luke 2:11, Luke 2:13-14 & Nativity Set, CTMH PP-Mistletoe, CTMH White Daisy CS, Bazzill Prismatics brown CS, Bazzill Mono green CS, Spellbinders-Labels 4 & Labels 18, Cheery Lynn Designs-Victorian Romance Flourish, Black Fine Felt Tip Pen, Lemon I ce Stickles, Copic Markers.

 Blessings,
Deneen

CHERE'S GIFT CARD HOLDER TUTORIAL:


 'Tis the Season to be thinking about Christmas cards and gift card holders.  Gift cards are becoming quite popular due to the fact the recipient can pick out their own gift and you do not have the tremendous shipping costs.  I have to admit I like to receive gift cards but I still love receiving something someone has thought about me and picked out.
I found this particular matchbook gift card fold at songofmyheartstamps.typepad.com.  I liked it because you can make four gift card holders from one 12 X 12 piece of cardstock.
How to:
Cut a 3 X 12 inch strip of cardstock and score at 3.75, 8, 8.75 and 9.5 inches.  Punch a shape out of holder side (I used 1.25 inch circle punch).  This will allow you to easily grab the gift card out of holder.  Then add thin strip of sticky strip (it needs to be thin so you have room for your gift card in the "envelope".  Also add thin piece of sticky strip to bottom of the matchbook fold near the lower edge (needs to be at the lower edge so top flap can easily tuck in to close card).
Card is finished, very easy.  As I said you can get 4 of these from one 12 X 12 piece of cardstock.  I made a minor adjustment to some of the others I made. This version has a flat flap, but if you are adding anything with a bit of bulk (say you want to add the gift card to a tag with a ribbon pull) then I added another score line at 4 inches.  I used all the same score lines as above but added an additional score line at 4 inches and this gives the "traditional" matchbook look.  The flatter version would be much easier to mail, since it is flat.  The second version would be better for hand delivery.
I hope you have a blessed day
Chere

A big thank you to both Deneen and Chere for these amazing projects!  Leave them some love in the comment section below!! 
Blessings,
Antoinette

Wednesday, November 13, 2013

12 Weeks of Christmas Week 5 + Birthday Celebration= Jamie's awesome tutorial


 Hello friends!
Today's post is covering 2 of our running tutorials!!  Jamie has made this WONDERFUL tutorial to share with you for both the 12 Weeks of Christmas AND our Birthday tutorial!  ONLY A FEW MORE DAYS TO TAKE ADVANTAGE OF THE 20% off sale at:  www.inspiredstamps.com  Now, here is JAMIE:

Do you find yourself looking for a thoughtful gift that doesn't cost a lot of money? I have a great tutorial for you. These are great for co workers, neighbors, etc. I have given these out several times and they are always a hit.


Here is a step by step tutorial of how I make these.
1. Cut out your paper. Each candy bar has different measurements. Leave an inch above and below and enough on the sides to overlap each other.
Thicker paper workers better but I have used cardstock decorated with think scrapbook paper. Sample below.
 2. Add glue or tape as shown in the picture. I prefer the red tacky tape because you don't have to worry about it drying.


3.  Glue the paper around the candy bar. I pull off the red tape and roll the paper around the candy bar.

4. Crimp the ends with a crimper. I you don't have a crimper just glue the ends together.

5. I added brads to the bottom (if you don't have a crimper than I would definitely add the brads to the bottom to keep it together more securely.)

6. Make two hole through the top and add your ribbon. I added a bell and love it!
7. Of course decorate! I used this super cute HLO. This is His Little Ones: Shepherd Boy. I colored him with Copics.

You can make these for any occasion. Here is another example I made for a birthday example.
I used card stock and thin DP on this one. I used HLO Angel on this one. These HLO from Inspired Stamps fit perfectly on these candy bar wrappers.

You can find these stamps and many others at the Inspired Stamps Store.
Blessings,
Jamie

Friday, October 25, 2013

12 Weeks of Christmas Tutorials with His Little Ones Characters: WEEK 4: 4" glass ornaments!

Hello friends!

Ok, this little His Little Ones stamp set is the HLO: angel stamp...and he is so brand new he is not even in the Inspired Stamps store until November 7th when he will debut as one of our new release stamps!!  So you are getting a SNEAK, sneak peek!!  But he was so perfect for my project today, I just HAD to share him with you early!!  And HLO: ANGEL stamp will be the giveaway to one person who comments on this week 4 tutorial (either here or on the facebook page!)---announced in next week's week 5 tutorial!

I have had a couple sets of these 4" ornaments laying around for a long time, knowing I wanted to put a stamped His Little Ones scene in them one day...and today's the day!:

You will want to have:
1.  the flat 4" circle ornaments (as shown above, they aren't completely flat, but have more flatted sides to them than the round)
2.  a colored His Little One stamped character with separate inked phrase (or another stamped image of similar size 2x3--our Single Scripture stamps (2x2) work great in here too...just put one Scripture back to back with another Scripture, then when it turns you can see the other Scripture :o)
3.  clear tape
4.  inside decor (I have feathers for my angel's back and long glitter pieces sprinkled in to represent snow or clouds...you could put in a piece of pine, mini pine cones, buttons, etc.)

First thing I did was to put the feathers inside and tape them to the back to hold them in place (feathers first, then tape....or the feathers won't go in as they get stuck on the tape)
Then color your His Little Ones character (I used Copic markers for the head, but STICKLES glitter for the body, feet, and wings and a little yellow Stickles for the hair along with light Copics), cut him out and roll him in  (He is not colored in the sample below):

Once He is in you put a little clear tape on the front of the feathers and use tweezers to put him in place and smooth him out so he's not rounded.  I added my phrase 'oh holy night' from the Inspired Stamps VINTAGE CHRISTMAS stamp set and glitter at this point and used a clean, dry paint brush to wipe the glitter off his face and the front of the ornament glass so he is better seen:
I wish you could seen his feathers in better view but I found out through much trial and error that getting a photo of such a reflective ornament is NOT an easy task so this photo was the best I could get!

I hope you enjoyed this half as much as I enjoyed creating it!  I cannot put this stamp set away, and know he will be well loved by many upon his release in the online store November 7th!

MAXINE D YOU won week 3's $10 online store credit!  Congratulations!  You have until next week's post to email us to claim your prize:  inspiredstamps@gmail.com (be sure to let us know what email you are registered with in our online store so we can get that right in for you!)

Have a blessed weekend and I'll be back soon with more artwork to share!
Blessings,
Antoinette

www.inspiredstamps.com    (our RETIRING/CLEARANCE packs will only be for sale this week or while supplies last!  Shipping is running within 1 business day on most orders!!)

Monday, October 21, 2013

12 Weeks of Christmas Tutorials with His Little Ones characters: Week 3

Hello friends!
We get a number of emails from crafters who do not enjoy coloring, but love our His Little Ones characters!  Today's post is dedicated to them as well as all who enjoy a nice, quick, craft---VINTAGE CIRCLE TAGS!

The key is to use a distressed color of ink.  I chose the Ranger Distress Ink: Walnut color.  I used it for sponging around the circle as well as stamping the letters, verses, and character stamps.  First, I got out my bag of circle tags with a kraft cardstock base:

Next, I used the Walnut ink to stamp my Inspired Stmaps: His Little Ones character stamps and the words with Labelmaker Alphabet.  Then I sponged random dark areas of walnut ink to give the tags their vintage look (note:  if you don't get a solid stamped image, it adds to the vintage look):
I attached these to a paper treat bag, but you could make a set of these as gifts for a friend, put them on Christmas or classroom presents, or even hang them on your Christmas tree (Many of our 2x2 Single Scripture Stamps would fit on a number of circle tag sizes!):

We are giving away prizes each week of our 12 Weeks of Christmas Tutorials!  Just leave a comment on this project below or on our Facebook page and we will choose/announce our winner of a $10 store credit in next weekend's post!

This week's winner is...
Linda E!!  And Linda asked where we got the clear plates...at our local WalMart, but any store that sells plates probably has them!
Linda, email us your mailing address and we will get your HLO: Winter Boy right out to you!!
You have until this upcoming Sunday to claim your prize!
inspiredstamps@gmail.com

Blessings,
Antoinette
  Check out all the CLEARANCE SETS OF STAMPS AT THE ONLINE STORE BEFORE THEY ARE GONE: