Welcome to this week's Christmas Tutorial with
Inspired Stamps!
Since I love Copics so much, I thought I'd share with you a little
about Copic markers and colouring. I'm certainly no expert but just
some tips from my own experience. I never knew I love colouring so much
till I bought my first set of Copic Markers.
When I first decided to try Copics, I had such a tough time deciding
what to buy. I must have read a hundred tips before I took the plunge.
Basically, the following are the Copic markers colours :
[B- Blue] [BG- Blue Green] [BV- Blue Violet] [G- Green] [YG- Yellow Green] [Y- Yellow] [YR- Yellow Red] [R- Red] [RV- Red Violet] [V- Violet] [E- Earth] [C- Cool Gray] [N- Neutral Gray] [T- Toner Gray] [W- Warm Gray]. I
buy mostly the Sketch markers, and the colours and numbers are labeled
on the tip of the caps. If you would like to know more about the Copics
colour chart and family, please click
here.
I thought I'd show you my Copics collection :) I have collected over
200+ markers and store them in jars so I can easily move them around or
pick some colours that I want to use - I colour while watching the tv
most days.
After buying so many markers, I must say I only use the few that I
really like, and it is too excessive to own so many markers :)
Here are some of my favourites, and this would be my recommendation to those who would like to start with Copics.
 |
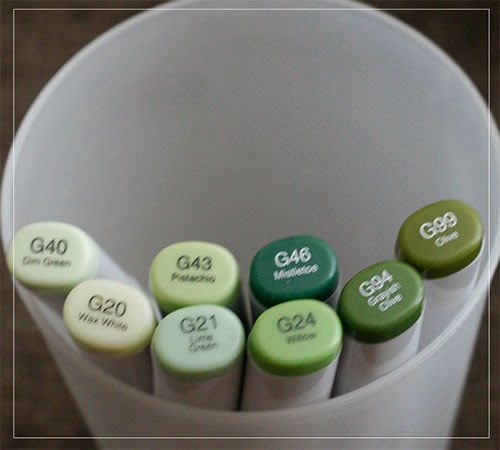
| These greens are my favourite, I love some of the YG combination as well |
 |
| These are my favourite pinks - the little Ciao in the photo is RV10 |
 |
| These are my favourites for backgrounds and skies |
 |
| My favourite blue range - great for colouring jeans |
 |
| I love the R30 series (I use them all the time) and also the R80's |
 |
| I love so many of the E series but these are my favourites, the 2 Ciao markers are E93 & #95. |
I'll share some step by step photos how I coloured the new
HLO: Angel
- which I absolutely love. My favourite skin colours are E13, E01 and
E50. I like to start with the darkest shade first, and then blending it
with the lighter shades.
 |
| Here, I just added E13 to the angel, just on the forehead, neck and hands as shown |
 |
| Then I blended E13 with a E01 the next lighter marker |
 |
| Using E50, I picked up the pink R20 and coloured the cheeks |
 |
| Then, I used E50 to blend everything, adding a little of E01 for areas where I need a little more shadowing |
|
For hair, I used E99, E23 and E21.
 |
| Add E99 as shown |
 |
| Add E25 and extend the strokes a little further |
 |
| Add E21 and blend the colours |
 |
| Blend a little more with E50, and colour his mouth with R20. Then I added some BG10 to his wings |
 |
| Added BG10, BG000 and the Colourless blender to the wings and his tunic and shoes. I added BG02 to the corners of his eyes. |
 |
| The little Angel |
Using a sharp pointed scissors, the image is cut out, and ready to be used on the card.
And, here is the finished card. I hope you find the step-by-step
instructions helpful, and if you have any questions, please email or
leave me a comment and I'll try my best to answer them. I'm not an
expert in Copics, I learnt how to use the markers mainly from watching
videos of manga artists in action :)
Thank you for visiting me. Have a great day!
Kary


i think you're a Copic expert. Two series of classes with the company, was it? And such beautiful work! Thanks for sharing!
ReplyDelete