Hello Friends!
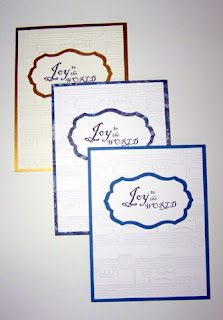
Today I want to show you the Christmas Card Sets I am making this year for my friends and family (well over 100, and that's all I'm gonna say LOL). I need SIMPLE, but ELEGANT designs and I don't want them all exactly alike, since we all know we look at everyone's cards when we go to family's and friend's houses and want to feel our card was hand made just for us! SO here is how I made mine. FEEL FREE TO COPY THESE TO MAKE YOUR OWN or something similar, just dont' submit them to contests or for publication please. As always you are free to make and sell sets with our stamps, and I am honored when you use my designs to do that (although this is so simple, I would be surprised if someone else hadn't thought this design up in some form LOL).
Here is what you need:
*4x5.5 card bases
*I used GLITTER TAPE in 3 different colors, but you could just use pretty ribbon or even make paper strips to look like the ribbon behind the verses.
*I used colored card stock that came close to matching my glitter tape riboons to mat my embossed white pieces with Cuttlebug Snowflake design.
*colored cardstock mats are 5.25x 3.75
*embossed white snowflake paper is 5.5x3.5
*I used the Spellbinder die cut for the lacy pattern I stamped the verses on and the insert ornament inside: 2012 Heirloom ornaments and Floral ovals
I also used the following Inspired Stamps:

this $13.99 stamp set that you can find
HERE

this $3.99 single Scripture stamp you can find
HERE

this $3.99 single Scripture stamp you can find
HERE

this $3.99 stamp you can find
HERE
WHAT THE CARDS LOOK LIKE:
I leave that white side on the left blank, but for family cards I attach a photo of our family by the tree there!
Here's how to make them:
I STRONGLY encourage the assembly line method when making a LOT of cards. I cut all my papers out and stack them. So I have a stack of the colored mats, in each of their colors, I have a stack of all the papers I've cut with the Spellbinders, all the papers I have cut and embossed, I cut all of the GLITTER TAPE in their strips and put them in a basket, by color, I tie all the ribbons ahead of time and put them in a basket. THEN I go through and STAMP everything that needs to be stamped (inside and out).
Once you've got all your materials ready, you can go and do each card one at a time OR assemble them in sets: so you may put all the embossed pieces on their mats first. Then adhere all those to the white card bases. Then do all the glitter tape ribbons onto the embossed. Then put all the stamped verses. Then adhere all the bows (with pop dots). Then add all the jeweled embellishments (optional).
I hope you will make your own cards this year using Inspired Stamps and send us a photo at inspiredstamps@gmail.com. We'd love to showcase what you are making using Inspired Stamps one day in December! Be sure to include your name and your blog address where we can find your photo of your cards (Thank you Sherry H. for this great idea!)
THIS COUPON to use the 25% off your TOTAL PURCHASE EXPIRES THURSDAY MIDNIGHT!:
Have a blessed day!
Antoinette


 this $13.99 stamp set that you can find
  this $3.99 single Scripture stamp you can find
  this $3.99 single Scripture stamp you can find
  this $3.99 stamp you can find


