Sunday, November 30, 2014

FREE SHIPPING+FREE STAMP SET: Cyber Week Special!!

Starts NOW!!

Hello friends!
This week (while supplies last!) you will receive one of the stamp sets you see above PLUS get free shipping (must use coupon code: 25freeshipping) when you order stamps this week at our etsy ship:

Happy Shopping!
We will be back with several exciting posts this week:
*Tomorrow begins a 25 Days of Christmas Bible Art Journaling segment I am doing and sharing, using Scripture and some fun techniques you can do with me or make it your own!
*Another 2 posts of our 12 Weeks of Christmas Card tutorials will be up on the blog
*Our Design Team has some incredible artwork to share!

Blessings,
Antoinette

Friday, November 21, 2014

TENT CARD TUTORIAL (week5 of our 12 Weeks of Christmas Card Tutorials!)

 
 Hello friends,  Deneen has a great tutorial for you today, so take it away Deneen!

Hello and welcome!  You may have seen my card for Inspired Stamps yesterday, well today I am sharing a short Tutorial on how I made it.  I found the inspiration of my card HERE by Beate Johns.


The stamp sets I used for this card are:  His Little Ones: Shepherd Boy, His Little Ones:  Angel, Sheep Laying and the sentiment is from Vintage Christmas.


Recipe:  Inspired Stamps SS-His Little Ones:  Shepherd Boy, His Little Ones:  Angel, Laying Sheep & Vintage Christmas, Bazzill Mono CS-Admiral, Splash & Ivy, CTMH White Daisy CS, Martha Stewart Grass Border Punch, XCut Ornate Frame Die, Viva Decor Glitter Line-Holo Iridescent, Copics.
 
   
These cuties are our HIS LITTLE ONES clear stamps that are only $4.49 over at the online store.  Deneen used our His Little Ones: Shepherd Boy and His Little Ones: Angel.  Also is a stamp from a Scripture Set called VINTAGE CHRISTMAS and the cute little sheep is only $3.99 and is called SHEEP LAYING.  You can find these and many more by clicking on our store link below:
Use coupon code: inspiredstampsFS at checkout and US orders 
get FREE SHIPPING on orders $25 and over!!

Thanks for stopping by!  Be sure to let us know if you create a tent card...we'd love to see it!
blessings,
Antoinette

Thursday, November 20, 2014

character Inspired Stamps in a scene cards

Hello friends!
Today a few of the DT have some beautiful character stamps in a scene cards to share.  Deneen will be showing you how to make her TENT CARD in Friday afternoon's 12 WEEKS OF CHRISTMAS TUTORIAL post.  Here's a few angles of her card, but you are really going to want to see all that she has put together tomorrow:

Chere also created a lovely card for you:

Shanta is the final DT member who has a card to share today and it's lovely too!!
You can find all these stamps at our new store:  www.etsy.com/shop/GodblessyourART  and get FREE SHIPPING on orders over $25 in the US!!  Use coupon code:  inspiredstampsFS

Thanks so much for your support of Inspired Stamps!
Blessings,
Antoinette


Monday, November 17, 2014

Thanksgiving Card + FREE SHIPPING!!

Hello friends!
Thanksgiving in the US is just over a week away and our Inspired Stamps Clear Stamp set: THANKSGIVING is perfect for cardmaking and scrapbooking your holiday!!

Jamie has created a lovely card using a couple of the stamps for you today:
Remember that through November all US orders will get FREE SHIPPING over $25 by using coupon code: inspiredstampsFS
Outside the US and wish to order?  You'll get $5 off your total shipping cost when you order over $25 in November!!  Just send us a message and we'll let you know total shipping cost before you place your order!

With snow on the ground here already, I know I'm ready to begin making my Christmas cards...how about you?

www.etsy.com/shop/GodblessyourART    (click to shop our etsy store!)

have a blessed day,
Antoinette

Sunday, November 16, 2014

Waterfall Card Tutorial: Belinda; Week 6 of our 12 Weeks of Christmas Card Tutorials

Hello friends,
FREE SHIPPING CODE: inspiredstampsFS for US orders!! etsy.com/shop/GodblessyourART


Today Belinda is  sharing a tutorial on a waterfall card using Inspired Stamps sweet Nativity set. Because the cutting and folding takes a little time, I kept the stamping very simple. I used to think this had to be  really difficult card to do found it's actually quite simple.
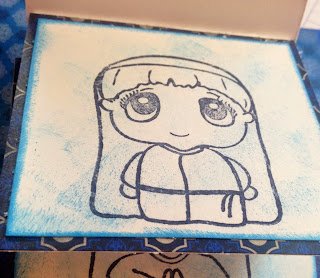
My card is 5x7 so start with a base of 10x7 folded in half.  You will also need 4 squares for your mats cut at 3x3 and 4 plain squares of 2 3/4"x2 3/4". I then used a light touch with a sponge to add color to the white squares and then inked the edges darker.  After they were all inked, I used a dark blue to stamp the images.
 Adhere each of the stamped images onto a mat.


Next cut a plain cardstock strip to 2 3/4" x 12". Then score the strip at 3", 3 3/4", 4 1/2" and 5 1/4". Fold on the score lines-as shown (all mountain folds).  
 Choose your bottom image and adhere it to the 2 3/4' square left from the 1st fold.
Pay close attention for the next image to only put adhesive on the strip, then carefully line up next image square over adhesive and right next to fold-not over or under it. Continue with last 2 squares.


I adhered coordinating cardstock to the bottom inside flap of my strip. Now cut a coordinating strip of cardstock 1"x5" and another 2"x5".  Center and adhere 1" piece to the edge of back of bottom square.
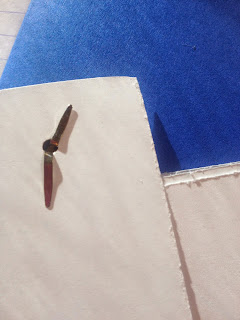
Attach ends of 1" piece over 2" piece with brads-NO adhesive


 Use adhesive on back of 2x5" piece and  adhere only to your card front approx 3/4' from bottom of card front.. The back of your waterfall strip should NOT be attached or glued to anything.  Slide it between your 1" and 2" strips between the brads. it becomes your pull "tab"


Thursday, November 13, 2014

Got STAMP LOVERS to buy for? Check out this gift idea...


Hello friends!
Today I have a quick post for you!  I have lots of stamp-loving-friends and had sent this particular tag out for a sweet woman who was looking for the little bible stamp from our Etsy store.  After I made this for her I realized these are fast and sweet ways to package your little stamp gifts! So I'm off to make more!

Here's the complete tag, set with a little tag to make a note to the person who receives it!  What a fun gift to unwrap!:
 I simply tied the clear bag with the two stamps in it onto the brown tag with some organza ribbon!

Be sure to head over to our new etsy store and see all the stamps we carry!
www.etsy.com/shop/GodblessyourART
we have FREE SHIPPING on all US orders over $25 through November!  coupondcode:inspiredstampsFS

Blessings,
Antoinette

Wednesday, November 12, 2014

Need Christmas or Thanksgiving Dishes? Try this instead...

Hello friends,
Do you scramble every year to find the perfect plates for each season of celebration?  I have a wonderful idea that will cross your favorite sport (stamping!) with filling this need!! 

Get the large white doilies as shown above, and stamp in the center of as many as you need!  I used the poinsettia from our Inspired Stamps: CHRISTMAS POINSETTIA stamp set here:
You then just get CLEAR dinner plates and put OVER the doilies.  For Thanksgiving, another example, would be to use one of the Scriptures from Inspired Stamps: THANKSGIVING set (now in the online store!):
Or one of our SNOWMEN stamps to keep the winter brighter:
Last year at our church's Christmas Tea, I used only the gospel (1 Corinthians 15:3-4) under each plate:
I hope you will try out this idea and let me know how it worked for you!  Thanks for stopping by today!
If you are shopping at our online store, be sure to bring your coupon code: inspiredstampsFS  to get FREE SHIPPING on all US orders over $25!

Blessings,
Antoinette                                             come check out our new online store!


Tuesday, November 11, 2014

Alcohol Ink with TILED BACKGROUND: 12 WEEKS OF CHRISTMAS CARD TUTORIALS week 7

Hello friends!
Today I have a tutorial on creating a tiled background with stamps.  Saturday I showed you how to get the background with alcohol inks on photo paper.  Today we will stamp a tree from Inspired Stamps FIR TREES (one of our first sets 4 years ago and still so popular!) onto the inked background.  Just use permanent ink, not dye based.  I cut into fourths:
AND added STICKLES to the tree for some snowy sparkle!
NExt... 
I glued to the purple BO BUNNY paper and the black cardstock, which created a window view!
I wanted to add one of my favorite snowmen from the Inspired Stamps: SNOWMEN set so I cut a piece of white paper same as the lower right window pane...

I saw about where I wanted my snowman to sit in the window, looking in at us...
Then I put the snowman onto the white piece of scrap paper that is the same size as the window pane, laid my snowman over, and cut out the extra parts of my snowman:
Then he sits perfectly looking in at us!!
I added another stamped image from the Inspired Stamps: SNOWMEN set and isn't he just HANDSOME sitting in there!!

The final card and inside:

I'll be back tomorrow with a cute and easy gift tag you may just consider making for your stamping friends!
Thanks for stopping by today!! 
Blessings,
Antoinette
www.etsy.com/shop/GodblessyourART   (free shipping on all US orders over $25 in November...come see all the Inspired Stamps (and this card will be up for sale too!)